You nudge the thermostat a notch, then another, and still the corners of the room feel strangely numb. On the radiators, paint is warm to the touch; near the skirting boards, a thread of air runs like a creek. Morning light finds the patch on the ceiling you’ve learned not to look at, and the boiler mutters in a steady loop.
Your house is saying something. You just have to learn its language.
The walls answered.
What your home is already telling you
Start with the way rooms settle after dark. On a crisp evening, walk from hallway to living room and pay attention to the gradient on your skin. If your face feels warm while your ankles tingle with cold, you’re living with heat stratification and draughts. That mismatch usually points to gaps in floor insulation, leaky skirting, or voids under suspended floors.
Touch, too, is a blunt but honest instrument. Press the back of your hand to internal wall surfaces on an outside wall. If the surface reads several degrees cooler than interior air, heat is escaping through a poor U‑value assembly or a thermal bridge around a lintel. The same test around window reveals a lot: a stone-cold sill and a whisper near the latch often means the gasket has given up.
We’ve all had that moment where the living room is toasty yet your toes stay frozen. That feeling isn’t “just old house charm”. It’s information. Listen for short, frequent boiler cycles, feel for cold seams where floor meets wall, and look for condensation ghosting behind wardrobes on external walls. These are the sketches of heat loss, drawn in minute-by-minute strokes.
A 1930s semi in Leeds tells the story neatly. The owners thought the house was “fine” because bills were manageable, yet their spare room stayed miserably cold. A quick look in the loft revealed patchy, slumped wool — 100 mm in some runs, bare joists in others. Topping up to 300 mm, adding simple baffles at the eaves, and sealing the loft hatch cut winter gas use by about 17% over the next cold snap. It also stopped a small damp bloom on the north wall that had been blamed on “the weather”.
Numbers back the hunches. A typical uninsulated roof can leak around a quarter of a home’s heat; 270 mm of mineral wool is the UK’s common benchmark for today’s standards. Cavity walls that lack proper fill often sit at U‑values well above 1.0 W/m²K, compared with nearer 0.6–0.7 once filled. If your inner surface temperatures sit more than 3–4°C below the room air on a cold night, you’re staring at a heat highway. That’s not speculation — it’s physics nudging you.
Think of heat as a quiet river following the steepest slope. It flows through conductive paths (solid walls, metal lintels), travels on draughts, and finds any gap it can in loft hatches or downlight cut‑outs. When insulation is thin, missing, or squashed, that river rushes. When the building fabric is continuous and air‑tight, it slows to a crawl. Read the signs, and you can map the river without ripping up a single board.
Practical checks you can run this week
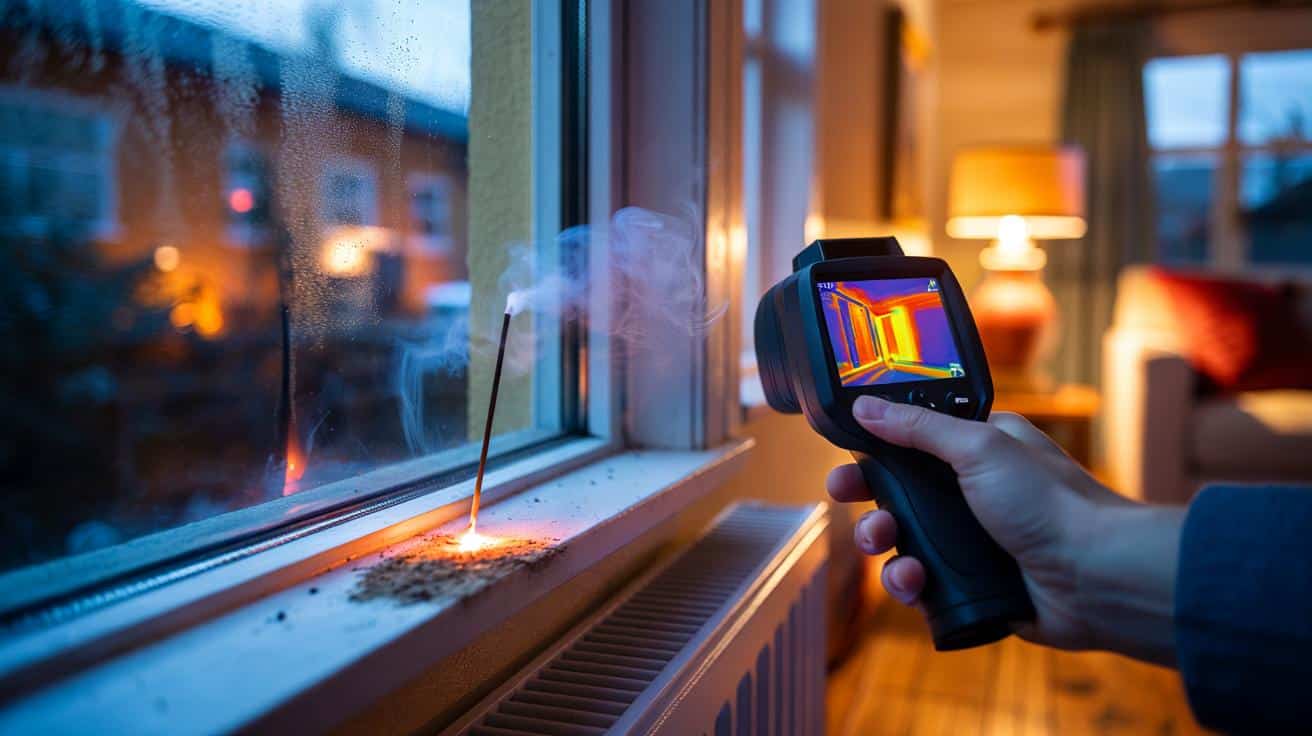
Do the easy thermometer trick. On a chilly evening, set your heating to a stable temperature for an hour, then measure wall and ceiling surfaces with an inexpensive infrared thermometer. Note the room air temp and the surface temp on an external wall, a window reveal, and the ceiling under the loft. If any surface sits 4°C or more below the room air, flag it for deeper inspection. If you can, borrow a **thermal camera** for a night-time sweep — libraries and community groups often lend them.
Climb into the loft with a torch and a ruler. Measure the wool: 270 mm of mineral wool is a decent line for most British homes; anything under 200 mm is a big opportunity. Look for bald patches around the loft hatch, squashed insulation under storage boards, and draughts blowing through the eaves where wind washes over the wool. Check for old downlights not covered with proper fire-rated covers; those holes leak heat and air. Let’s be honest: nobody does that every day.
Normalise your energy bills with **degree days** to strip out weather noise. Take last winter’s gas kWh and divide by the heating degree days for your postcode; track the ratio this season after small fixes to spot genuine gains. You’ll also learn whether your perceived “cosy enough” actually costs more than it should.
“The house will always tell you where it hurts — your job is to listen with a thermometer, not just your skin.” — Sarah Kent, domestic energy assessor
- Incense stick test: on a windy day, run smoke along skirting boards, sockets on external walls, the loft hatch, and around window frames. Watch for sideways flicks.
- Paper test on doors: trap a strip of paper in the door. If it slides out easily, the seal is tired.
- Radiator niche check: feel the wall just above radiators on external walls. If it’s markedly cold, the niche may be a thermal bridge.
- Smart meter sprint: note gas use over a steady 30 minutes with heating on, then off. Fast temperature decay often signals air leakage and weak insulation.
- Loft hatch: touch the hatch underside on a cold night. If it’s chilly, add rigid board insulation and a compressible seal.
Windows deserve their own moment. Run your hand around the frame on a breezy day and feel for threads of air, especially at the top corner and the meeting rail. Single glazed panes will radiate cold and gather condensation, yet tired double glazing can do a poor impression of single if the seals have failed and the unit has misted. If your curtains dance when the wind picks up, that’s not romance — that’s your heating budget leaving the scene.
Suspended timber floors love to leak. Older homes with air bricks often have a chilly void underfoot, and if the insulation between joists is patchy or missing, your toes pay. Lift a small corner of a floorboard where feasible and look for mineral wool or rigid boards properly supported. If you can’t lift boards, a professional can snake a small camera through a drilled hole and check the void. Anything is better than guessing.
Cavity walls can be a question mark. Houses from the mid‑20th century often had cavities retrofilled, but not always well. From the street, look for a tell‑tale pattern of small mortar patches — that hints the work was done. Where comfort still feels off, a borescope inspection from a discreet drill hole can reveal areas where insulation slumped or bridged with damp. No need to panic; it’s about knowing what you’re dealing with.
For a step up, consider a **blower door test**. A pro will depressurise the house and measure how leaky it is at 50 pascals, often giving you an air‑changes‑per‑hour figure and a walk‑round to find leaks. In the UK, many older homes sit between 7 and 15 m³/h·m² at 50 Pa; tightening that even modestly can make insulation work better by stopping cold air from sneaking past it. Pair the test with a thermal camera session for a proper map of weak spots.
Numbers help translate your findings into action. Rule of thumb: 100 mm of mineral wool gives you roughly R‑2.5 m²K/W; 270–300 mm lands nearer R‑6–7. Cellulose is similar, rigid PIR boards higher for the same thickness. If you measure loft wool at 150 mm with wind washing the edges, you’re not close to where you think you are. *Do this on a clear, cold evening for the starkest contrast.*
Moisture tells its own truth. If you’re seeing black specks above skirting on an external wall, or a dull grey halo around a picture frame, that’s a sign the inner surface is too cool and crossing closer to the dew point. Warmer internal surfaces from better insulation reduce that risk. It’s not just comfort — it’s the difference between a crisp wall and one that whispers mould stories in March.
Sockets on external walls are sneaky. Pop the faceplate (power off) and look behind: in many houses there’s a breeze in the cavity behind the box. Simple gaskets or foam pads slow the air. Small, boring fixes add up to a big, unboring change in how your insulation performs day after day.
Where this leads
Once you’ve mapped the cool seams and lively draughts, the picture of your house sharpens. You stop thinking “it’s just an old terrace” and start seeing the few places that let the whole system down. Maybe it’s a thin loft, maybe it’s a whistling floor, maybe it’s a sad window gasket on the weather side. Each one is fixable.
You can go deeper. Track a week of surface temperatures with a cheap data logger on an external wall; the curve shows how quickly that surface cools when the heating clicks off. Pair that with your smart meter readout and you’ll spot patterns that feel oddly personal — like the way Sunday roast warmth hides Tuesday’s leaky back door. Small patterns become leverage.
There’s also a quiet joy in chasing silence from the wind. Close up the obvious gaps, layer the loft properly, and those edgy temperature swings mellow. Conversation sounds softer. Your boiler breathes easier. And when friends ask how you made a “cold house” feel friendly, you’ll have a handful of simple checks to share — not jargon, just the lived wisdom of a home that finally holds its heat.
| Point clé | Détail | Intérêt pour le lecteur |
|---|---|---|
| Surface temperatures tell the truth | Cold‑night IR readings 4°C below room air flag weak spots | Quick DIY signal of where insulation underperforms |
| Loft depth matters | Target 270–300 mm mineral wool with eaves baffles and sealed hatch | Big savings for low cost and an immediate comfort lift |
| Air tightness amplifies insulation | Seal draught paths and consider a pro pressure test | Warmer surfaces, fewer cold corners, lower bills |
FAQ :
- How can I tell if my cavity walls are insulated?Look for small mortar patches in a regular grid on the outside walls, then confirm with a borescope through a discreet drill hole. Thermal imaging on a cold night also shows stripy, colder bands if cavities are empty or patchy.
- Is 100 mm of loft insulation enough?Not really for UK conditions. Aim for 270–300 mm mineral wool, keeping it fluffy, continuous, and protected from wind at the eaves. Thin or squashed layers lose performance quickly.
- Do I need a thermal camera?No, but it’s brilliant. A borrowed or hired camera reveals cold bridges and missing insulation fast. If that’s not an option, an infrared thermometer and your senses still get you most of the way.
- My windows mist up — is that insulation or humidity?Both can play a part. High indoor humidity creates condensation on the coldest surfaces; failed double‑glazing units and single panes are colder, so they wet up first. Improving ventilation and upgrading gaskets often helps.
- What’s a good air tightness level for an older home?There’s no single number, but many existing homes sit above 7 m³/h·m² at 50 Pa. Dropping that figure meaningfully through sealing work makes every bit of insulation you have perform better.


Great guide—never thought about comparing surface temps to room air. Any budget IR thermometer you’d reccomend, and what emissivity setting should I use on painted plaster vs. glossy tiles?
Tried the incense stick test and set off my smoke alarm; does that mean my house is well ventilated or just dramatic? 🙂