Cold walls, steamed windows, and that stubborn musty smell that creeps back after every repaint — many homes discover new damp patches right after a well-meant insulation job. The warmth goes up, the bills go down, and then the corners blush grey. You didn’t plan for that. No one does.
The homeowners had just added thick insulation and were proud of their toasty living room. Their dog loved it. Their walls didn’t. In the kitchen, a kettle hissed, the windows fogged, and the extractor hummed like it knew it was losing. The builder tapped the plasterboard and shook his head. “It’s not the paint,” he said. “It’s the air.” The house was warmer. The air was wetter. The walls were colder. That’s when the penny dropped. Something was hiding in the layers.
What really happens when heat meets humidity
Insulation changes the choreography inside your walls. Warm, moist indoor air wants to drift into cooler zones, and if it hits a surface below the dew point, water appears out of thin air like a sleight of hand. That can happen inside the wall, not just on the paint. Add a tight layer in the wrong place and you shift where that magic trick occurs. The result looks like damp, but the cause is physics.
A typical family releases 10–15 litres of water into indoor air each day through showers, cooking, and just breathing. Picture a freshly insulated loft where the eaves vents are blocked by new quilt, or a snug room with sealed windows and a tumble dryer venting inside. Things feel cosy, then a grey bloom starts near the skirting. The insulation did its job. The moisture followed a new path and found a colder corner to cling to.
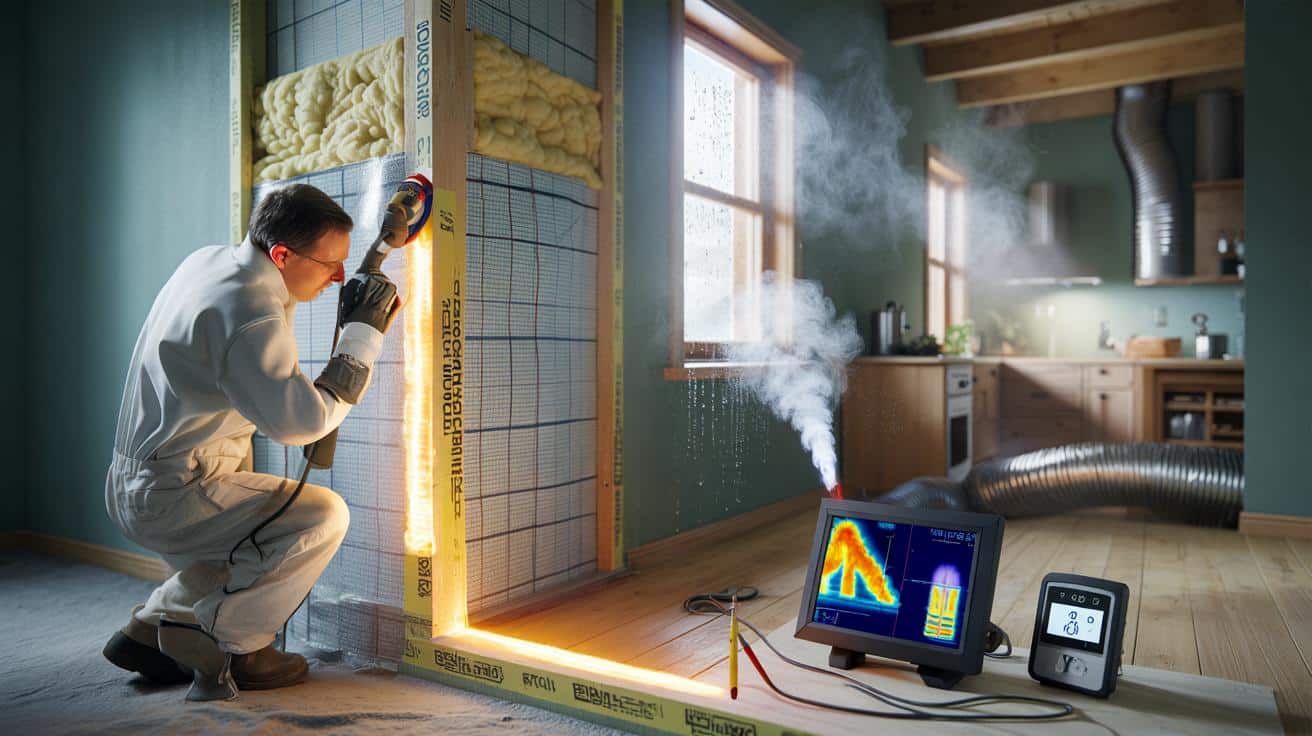
Most moisture moves with air, not by slow diffusion through materials. That’s why **air‑tightness** — not just insulation thickness — matters for dry walls. Gaps around sockets, the loft hatch, and junctions between old and new can pump humid air into the fabric. Thermal bridges at joists and steel beams become cold rails that collect condensation. You don’t see it until the paint flakes, but the story starts deeper, where temperature and vapour pressure trade blows.
Keeping walls dry while you add insulation
Start with bulk water. Fix leaks, gutter falls, cracked sills, and ground levels that splash brickwork. Then design the build-up so moisture can be controlled, not trapped. Use a **vapour control layer (VCL)** on the warm side in cold climates, sealed at every seam and service penetration. Prefer vapour‑open layers toward the outside so any stray moisture can dry outward. Think continuity at edges; tape and gaskets are your friends, not afterthoughts.
Ventilation is your safety net. Bathrooms and kitchens earn quiet, continuous extract, ideally with humidity boost and ducts that actually reach outside, not the loft. Background vents only help once the building is airtight enough to guide air on purpose. We’ve all had that moment when the window trickle vents are shut all winter because the room feels draughty. Let’s be honest: nobody actually does this every day. Balance comfort with controlled fresh air, and aim for 40–60% indoor RH.
Common mistakes? Putting foil‑backed boards in a way that creates a double vapour barrier, compressing mineral wool until it stops insulating, and ignoring thermal bridges around window reveals. Don’t sandwich timber between two tight layers; give it a drying direction. Commission a blower‑door test so air leakage is measured, not guessed. A small gap around a pipe can move more moisture than a square metre of wall by diffusion. The dew point doesn’t negotiate.
“Warm side tight, cold side breathable. Keep water out, let moisture escape, and the house will forgive your other sins.”
- Room‑by‑room hygrometer to track RH over a week
- Smoke pencil for finding sneaky air leaks
- Thermal camera or IR phone add‑on for cold‑spot checks
- Quality tapes, grommets and mastic for VCL continuity
- Quiet, continuous extract fans with proper ducting
- Moisture meter for timber and plaster at tricky junctions
Think like a building, not a product
Insulation isn’t a jumper you throw on your house. It’s a re‑balance of heat, air, and moisture. A vapour‑open wall with wood fibre and lime plaster can dry both ways, which suits older brick and stone. A cavity with internal PIR needs a meticulous VCL and tidy services zone. Both can work. Both can fail if a downpipe empties onto the wall or a bathroom fan limps along at half speed.
Pick materials for the whole assembly, not just U‑value. External wall insulation often reduces thermal bridges better than internal liners, while internal systems need careful detailing at floors, sills, and party‑wall returns. If in doubt, a hygrothermal model (think WUFI) can test whether your chosen stack‑up stores or sheds moisture across seasons. That sounds nerdy. It’s cheaper than replastering a lounge.
Modern homes thrive on clear rules. Keep bulk water out. Control indoor humidity. Stop warm, wet air slipping into cold layers. Provide a drying path so yesterday’s shower doesn’t become tomorrow’s mould. Use **balanced ventilation** if you go very airtight, and don’t ignore the humble gap under a door. Small habits — lids on pans, doors closed during showers, a gentle trickle of fresh air — make the layers you buy look clever.
There’s no single fix, and that’s the point. The best insulated homes behave like well‑rehearsed bands: the drummer (air‑tightness) sets the beat, the bass (ventilation) holds the room steady, and the lead guitar (insulation) gets the applause. Swap the order and the song falls apart. Your house will tell you what it needs if you read the fog on the glass, the temperature at the corners, the rhythm of the fan. Share what you learn. Neighbours copy what works.
| Point clé | Détail | Intérêt pour le lecteur |
|---|---|---|
| Control air first | Seal leaks, install a continuous VCL, test with blower door | Lowers hidden moisture transport and mould risk |
| Guide drying paths | Vapour‑open to outside or carefully designed dual‑drying assemblies | Helps materials recover after wet weather or high‑RH days |
| Vent where moisture starts | Quiet continuous extract, doors closed for showers, lids on pans | Reduces indoor RH without sacrificing comfort |
FAQ :
- Do I need a vapour barrier with internal insulation?Often a smart VCL on the warm side is the safer choice than a true barrier. It limits winter vapour flow yet lets the wall dry back when RH rises.
- What RH should I aim for at home?Keep it around 40–60%. Below 40% feels dry on skin; above 60% pushes condensation and dust mites. A small hygrometer pays for itself.
- How can I ventilate if I’m making the house airtight?Tighten first, then add reliable extract or MVHR. Airtightness guides air along the planned route rather than random cracks.
- Will spray foam trap moisture?Closed‑cell foam is very vapour‑tight and needs careful design to avoid trapping damp. Open‑cell is more vapour‑open but still needs an overall drying strategy.
- Can breathable materials stop all damp?They help manage moisture, not fix leaks. Sort gutters, sills, flashing and ground levels before banking on “breathable” alone.


Brilliant breakdown of air-tightness vs insulation! The drummer/bass/guitar analogy finally clicked for me. Quick Q: for a 1920s brick semi with internal PIR, would a smart VCL plus service void be safer than foil-backed boards at the reveals? Worried about double vapour barriers and those sneaky thermal bridges.