Preheating dragging on forever? Before you price up a replacement, try a bit of love. Small, quick jobs can lift an ageing cooker from sulky to sharp, trim your energy use, and bring back the roast you remember.
The other night, I stood in a narrow London kitchen watching a tray of chips go from pale to patchy in one maddening sweep. The fan hummed like an old bus. The door squeaked a sigh I’d heard a hundred times but never really noticed. Grease on the glass had turned amber, the kind of stain you pretend is character until the bill lands.
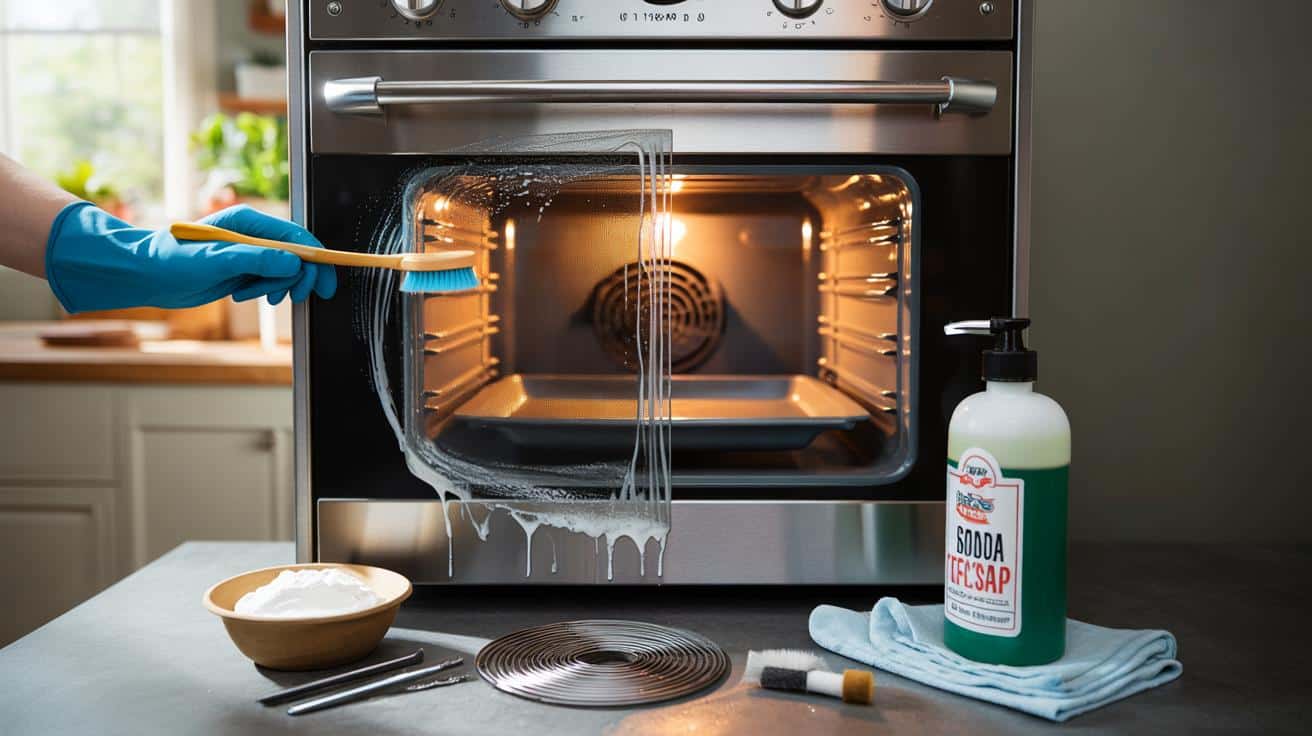
My friend, who flips between cook and tinkerer, handed me a soft brush and pointed at the rubber seal. He said nothing else. I laughed. He didn’t. I ran the brush along the gasket, wiped, then tightened a hinge screw by half a turn. The next tray baked evenly, and the room felt… lighter. The trick was a toothbrush.
Why your old oven feels tired
Most ovens don’t fail overnight. They fade. Heat sneaks out past a tired door seal, tiny crumbs smoulder on the base, and a film builds on the thermostat probe so the machine thinks it’s hotter than it is. Little inefficiencies stack up into bigger ones. **Heat loss is money loss.** The fan pulls air through dusty vents, working harder for worse results. None of that sounds dramatic, but it’s exactly why roast potatoes go soft on one side and coal on the other.
In a rental in Manchester, a 12-year-old oven took 18 minutes to reach 200°C, buzzing like a bumblebee in a jar. We pulled the racks, soaked them in hot water and bicarbonate of soda, then cleaned the door seal with washing-up liquid and a cloth. *You can hear the grit under the dial, a tiny reminder of last year’s roast.* After a gentle vacuum around the vents and a wipe of the temperature sensor, preheat time dropped to 10 minutes, and the buzzing calmed to a polite whirr. No new parts. Just care.
Here’s what’s going on. Grease is an insulator, so when it coats the sensor, the oven overshoots and cycles more often. Exhaust vents matted with fluff restrict airflow, weakening convection and forcing longer cook times. A flattened gasket can leave a 2–3 mm gap; that leak bleeds heat every time you open the door. Hinges slacken, shifting the door alignment and breaking the seal at the top edge first. **Grease is an insulator.** It’s not just about clean looks. It’s physics with gravy.
The quick hacks you can do today
Start at the door. Turn the oven off at the wall and let it go cold. Pop out the racks and soak them in a bath or sink with hot water, washing-up liquid, and two tablespoons of bicarbonate of soda; 30 minutes later, most grime slides off with a scrub. Wipe the rubber seal (the gasket) with warm soapy water, lifting crumbs with a soft toothbrush. Run a damp cloth along the groove the seal sits in. If the glass is cloudy, a paste of bicarb and a splash of vinegar breaks the browning without scratching.
Next, deal with airflow. Lift the fan cover if your model allows, or at least wipe through the slots and vents; a vacuum with a brush attachment gently clears dust around the edges. Dab the metal thermostat probe with a cloth and soapy water—no soaking, just a quick clean so it can read the heat again. Avoid aluminium foil on the oven floor; it blocks airflow and can reflect heat back at the element. We’ve all had that moment when you open the door five times to check a cake. Try a clean window and a working light instead. Let’s be honest: nobody polishes a door gasket every week.
Calibrate the heat. Place an oven thermometer on the middle shelf, heat to 180°C, and see where it settles after 20 minutes. If it’s off by 10–20°C, check your manual; many dials and digital models allow a small temperature offset. For a low-tech check, sprinkle a spoon of sugar on a tray; it melts around 160°C, so if it stays granular long past that, you’ve got drift. Replace a blown bulb and level the oven; both drive more peeking and uneven bakes.
“Nine times out of ten, the ‘broken oven’ I’m called out to is a dirty sensor or a tired door seal,” says Mark, a repair engineer in Leeds. “Ten minutes and a cloth saves people a new cooker.”
- Five-minute fixes: tighten hinge screws, clean the seal groove, wipe the sensor.
- One-hour job: soak racks in hot bicarb water and clean glass panels.
- Low-cost upgrade: replace the door gasket—most snap in like a bike tyre.
- Smart habit: heat with the right shelf in place; preheating empty racks wastes energy.
Keep it running like new
Think of your oven like a bike that needs air in the tyres and a drop of oil. A cleaner cavity reflects heat better, a proper seal holds it longer, and an honest thermostat stops you chasing temperatures with guesswork. **Small parts fail first.** Swap a tired gasket, a bulb, and a chalky knob before you blame the whole machine. If you’ve got gas, a steady, mostly blue flame says you’re in a good place; yellow tips can mean soot and service time.
Little routines pay back. Wipe spills while the oven is just warm, not hot. Keep a cheap oven thermometer on the middle rack and check it once a month. Use a baking stone or heavy tray as thermal mass on the lowest shelf; it evens swings and speeds recovery after you open the door. If the fan screams or rattles, don’t push it for months—clean the cover and, if needed, get the bearing looked at before the motor goes.
None of this needs a workbench or a YouTube degree. It’s the sort of light-touch care that saves electricity, rescues Sunday roasts, and pushes a faithful old cooker into a second, better life. Share the trick with a neighbour, swap a toothbrush for a gasket, and you might fall back in love with your oven. What starts as maintenance often ends as pride.
| Point clé | Détail | Intérêt pour le lecteur |
|---|---|---|
| Seal and sensor clean | Wipe the door gasket groove and thermostat probe | Restores heat accuracy and stops leaks |
| Simple calibration | Use an oven thermometer or sugar melt test | Better bakes at the temperature you expect |
| Airflow matters | Clear vents, avoid foil on the base, level the oven | Faster preheats and even cooking, less energy used |
FAQ :
- How do I know if my door seal needs replacing?If you can slide a thin card between the seal and door when closed, or see browned, cracked rubber, it’s time. Look for heat haze around the top edge during a bake. Most seals pull out and push in—no tools, ten minutes.
- Can I calibrate the oven without a thermometer?Yes. Spread a spoon of sugar on a tray and set 160°C; sugar should melt within 10–15 minutes. For 200°C, a thin splash of vegetable oil should shimmer and run freely. These aren’t lab tests, but they’ll flag a big drift.
- Is bicarbonate of soda safe on enamel and glass?On cool surfaces, yes. Make a light paste, spread, wait, and wipe. Avoid scouring pads on glass and skip strong oven cleaners on aluminium parts. Rinse with clean water to stop a chalky film forming.
- Why does my oven smoke every time I turn it on?Burnt fat on the floor or near the element smokes as it reheats. Pull racks, lay a damp cloth on cool residue to soften it, then lift it away. Check the grill pan and the hidden ledge under the door lip—that trap loves crumbs.
- Are there quick habits that lower running costs?Preheat with only the racks you’ll use. Cook multiple dishes back-to-back to ride residual heat. Use the right shelf level, and keep the window clean so you open the door less. Small habits add up on the bill.