Japanese maples can light up a small courtyard or anchor a large border, but they punish clumsy timing. Cut at the wrong moment and sap oozes, pests come calling, and that prized layered silhouette warps. Cut at the right moment and you sharpen the outline, boost airflow, and set up richer colour later in the year.
The pruning window that protects shape and colour
Acer palmatum and its cousins respond best when you work during true dormancy. In most of the UK, that sweet spot runs from late November through mid-January. Growth has shut down, sap pressure sits low, and wounds dry quickly. On cold, dry days the cambium stays quiet, so cuts seal neatly and the tree keeps its poise.
Best window: late November to mid-January. Dormant sap, cleaner cuts, fewer insects, and less disease pressure.
Choose a still day without rain. Wet bark invites spores into fresh cuts. Avoid deep freezes that make wood brittle. Stand back before you start and study the outline. Maples show their structure in winter; the bones of the tree guide every cut you make.
Dates to avoid and why bleeding happens
As days lengthen in late winter, sap starts to rise. Prune then and you often trigger a sticky weep that can run for days. It rarely kills the tree, but it delays sealing, draws insects, and exposes tissues to pathogens. Spring and early summer cuts bring a second problem: the tree diverts energy into healing rather than leaf and twig growth, which blunts the display you wanted to enhance.
Skip late winter and spring. Rising sap turns fresh cuts into beacons for borers, wasps and disease spores.
Mark two red lines in your diary: late February and April. If you feel tempted to snip in these periods, resist. Wait for the dormancy window or postpone light edits until leaves harden in midsummer on other species. With Japanese maples, patience pays twice—cleaner healing now and stronger colour later.
What to cut, and what to leave
Japanese maples look their best when you respect their natural architecture: tiered, airy, and slightly horizontal. Aim to edit, not remodel. Remove what steals energy or mars balance, then stop.
- Take out dead, diseased or damaged wood first; much of it hides on the underside.
- Remove crossing or rubbing branches that invite wounds and canker.
- Snip inward-pointing shoots that clog the centre and trap moisture.
- Cut out suckers and any coarse, mismatched shoots that break the tree’s rhythm.
- Leave well-spaced side branches that extend the layered form; they do the visual heavy lifting.
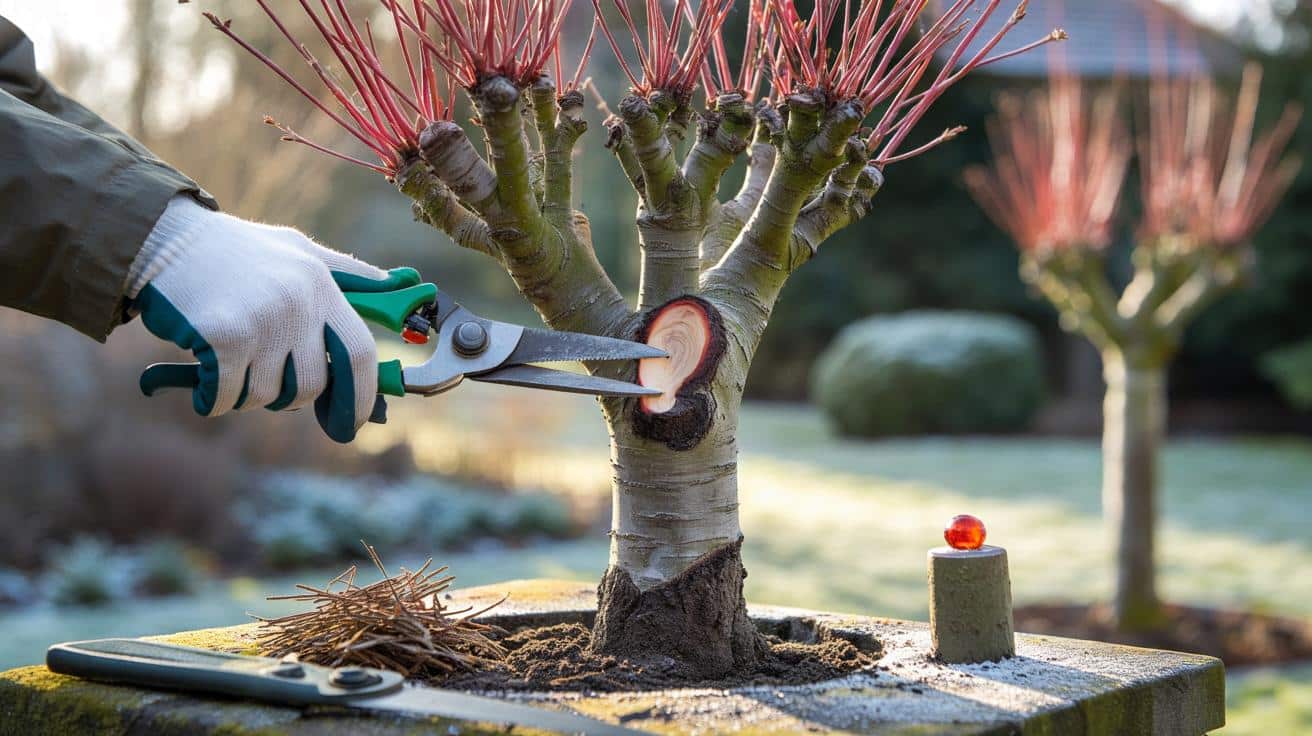
Work with sharp bypass secateurs for twigs, a pruning saw for thicker pieces, and keep a bottle of 70% isopropyl alcohol to clean blades between cuts. Make each cut just outside the branch collar and avoid leaving stubs. Step back often to judge balance from different angles.
The 15 per cent rule and safe cut sizes
Japanese maples sulk after heavy pruning. As a guide, remove no more than 10–15% of the canopy in a single year. Limit cuts bigger than 3–4 cm in diameter. If a large limb dominates, reduce it gradually over two or three winters rather than in one go.
| Job | Timing | Tool | Reason |
|---|---|---|---|
| Deadwood removal | Late Nov–mid Jan | Bypass secateurs | Prevents pests, tidies outline |
| Light interior thinning | Dec–early Jan | Secateurs or folding saw | Improves airflow, reduces mildew |
| Sucker and basal shoot removal | Nov–Jan | Secateurs | Preserves cultivar shape |
| Emergency broken limb | Any time | Pruning saw | Prevents tearing and infection |
Young trees versus mature specimens
Set the framework early on a young tree. Choose a clear leader or a balanced multi-stem, then select a few lateral branches at different heights to build tiers. Keep the lowest tier off the soil by 30–45 cm to avoid splashback and rot. On a mature maple, focus on refinement. Thin congested areas, lift a drooping branch tip by shortening to a discreet side shoot, and preserve the silhouette that drew you to the plant in the first place.
Container-grown maples and small spaces
Container trees dry faster and grow more slowly, so you usually prune less. Check structure in mid-winter and remove only what looks out of place. If a pot-bound tree needs root work, carry it out in early January while fully dormant. Lift the tree, trim back outer roots by 10–20%, refresh the compost, and water lightly. Do not pair heavy top pruning with heavy root pruning in the same year; spread the work to reduce stress.
Weather swings and shifting sap rise
Warm spells in January can nudge sap early. Watch the buds. If they plump and the scales start to part, you move closer to the bleeding zone. Pick a crisp, dry day while buds still feel tight. Make one test cut on a small twig. If sap surfaces, stop and wait for colder conditions.
Use the bud test: tight, hard buds signal safe pruning; soft, swelling buds warn of sap on the move.
Aftercare that helps wounds close
Skip wound paints. They trap moisture and slow callus formation. Instead, clear debris from the branch collar, mulch with 2–3 cm of well-rotted organic matter, and keep the root zone evenly moist through spring dry spells. A light, balanced feed in April can support recovery, but avoid high-nitrogen fertiliser that pushes soft, pest-prone growth. In exposed gardens, shield freshly thinned trees from harsh wind that can desiccate new twigs.
- Five-minute follow-up: recheck every cut for clean edges and remove any ragged bark.
- Watering guide for pots: 1–2 litres once or twice a week in summer, adjusted for rain and heat.
- Mulch margin: keep mulch 5 cm away from the trunk to prevent rot.
If you pruned at the wrong time, here’s a recovery plan
If you cut in late winter and sap bled, do not panic. Leave the tree alone and let the flow subside. Keep blades away until next winter. If cuts look large, shade that section during hot spells to limit scorch. Where a branch now looks unbalanced, plan a two- or three-year correction: shorten competing limbs in stages, always to a side shoot that points in the direction you want growth to continue.
A three-year example to fix a leggy maple
Year one: remove deadwood, one or two crossing branches, and no more than 10% of the canopy. Year two: reduce one dominant limb by cutting back to a well-placed side branch, and open a crowded interior section. Year three: tidy the outline, lift a low branch to improve clearance, then stop. This staged approach limits stress, preserves character, and sets up a stronger autumn show without a drastic chop.